In the whirlwind of daily life, having a well-stocked kitchen can be a game-changer when it comes to preparing delicious and nutritious meals without the stress – after all, who feels like starting from scratch on a Monday night? Here are 3 foods you’ll want to have prepped and ready to go for nutrition, convenience and taste.
By strategically prepping key ingredients in advance, you can streamline your cooking process, save time, and ensure that wholesome meals are always within reach, even on the busiest of days. Here’s how to do it.
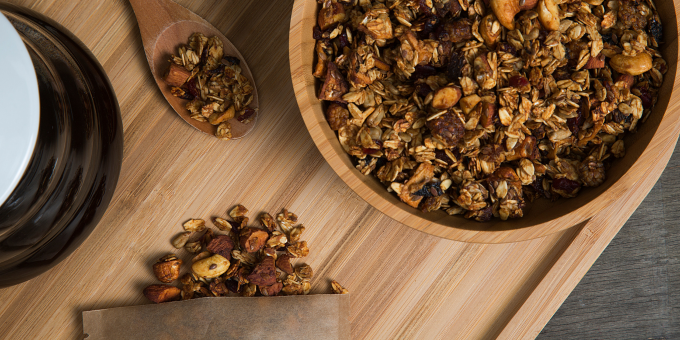
Homemade Granola

Granola is a pantry staple that packs a punch in both flavour and nutrition – but your supermarket varieties are often loaded with sugar and ultra-processed grains, sapping the nutrients out and spiking your blood sugars. But there’s a way you can make it at home with affordable ingredients – by whipping up a batch of this wholesome treat in advance, you'll have a versatile snack on hand that can be enjoyed in a variety of ways throughout the week. To make your own granola, simply combine rolled oats, nuts, seeds, dried fruit and coconut flakes with your favourite spices and flavourings. Bake until golden brown and fragrant, then store in an airtight container for easy access. Add cacao nibs to the mix after they’ve cooled for a chocolatey flair. Enjoy your homemade granola with yoghurt and fresh fruit for a nourishing breakfast, sprinkle it over smoothie bowls or oatmeal for added crunch, or munch on it straight from the jar for a satisfying snack on the go.
Storing Homemade Granola:
- Once you've made a batch of homemade granola, proper storage is key to maintaining its freshness and crunchiness.
- Store your granola in an airtight container or resealable bag at room temperature, away from direct sunlight and moisture. This will help prevent the granola from becoming stale or soggy over time.
- For long-term storage, you can also freeze homemade granola in an airtight container or freezer bag for up to three months. Simply thaw it at room temperature before enjoying.
Tips and Tricks for Freshness and Ease of Use:
- To keep your homemade granola fresh for longer, consider adding a desiccant packet or two to the storage container. These packets absorb excess moisture and help prevent the granola from becoming soft or clumping together.
- For added flavour and variety, experiment with different mix-ins and flavourings when making your granola. Try adding dried fruit, coconut flakes, chocolate chips, or spices like cinnamon and nutmeg for a personalised touch.
- If you prefer chunky granola clusters, press the mixture firmly onto the baking sheet before baking and avoid stirring it during the baking process. Once cooled, break the granola into clusters of your desired size for a satisfying crunch.
Creative Uses for Homemade Granola:
- Enjoy a hearty breakfast by sprinkling homemade granola over Greek yogurt or cottage cheese, along with fresh fruit and a drizzle of honey or maple syrup.
- Add crunch to your morning smoothie or acai bowl by sprinkling a handful of granola on top for added texture and flavour.
- Use homemade granola as a topping for oatmeal, pancakes, waffles, or French toast for a delicious and satisfying breakfast treat.
- Incorporate granola into homemade energy bars or protein balls for a convenient and portable snack on the go.
- Create a crunchy parfait by layering alternating layers of yogurt, granola, and fruit in a glass or jar for a wholesome and satisfying dessert or midday snack.
By storing your homemade granola properly and getting creative with how you use it throughout the week, you can enjoy the benefits of this crunchy and nutritious treat in a variety of delicious ways. Whether enjoyed on its own or as a versatile ingredient in other recipes, homemade granola is sure to fuel your day with wholesome goodness.
Stock: The Foundation of Flavour

Stock is the unsung hero of the kitchen, providing a rich and flavourful base for countless recipes. Instead of relying on store-bought options loaded with sodium and preservatives, why not make your own homemade stock using leftover ingredients you already have on hand? Simply save vegetable scraps, chicken bones, and other odds and ends in a container in the freezer until you have enough to make a batch of stock. Simmer the ingredients with water, aromatics, and herbs for a few hours, then strain and store the liquid gold in jars or ice cube trays for convenient portioning. Use your homemade stock as the foundation for soups, stews, sauces, risottos, and more, adding depth of flavour and nutritional value to every dish. With homemade stock at the ready, you'll never be more than a few minutes away from a delicious and satisfying meal.
Storing Homemade Stock:
- Once you've made a batch of homemade stock, proper storage is essential for preserving its flavour and versatility.
- Allow the stock to cool to room temperature before transferring it to airtight containers or resealable bags.
- For short-term storage, refrigerate homemade stock and use it within 3-4 days.
- For longer-term storage, freeze the stock in ice cube trays or freezer-safe containers for up to 6 months.
- Freezing the stock in smaller portions, such as ice cubes, allows for convenient portioning and thawing as needed.
Tips and Tricks for Freshness and Ease of Use:
- Label and date your containers of homemade stock before storing them in the refrigerator or freezer. This will help you keep track of when the stock was made and ensure that you use it before it spoils.
- To save time and reduce waste, consider making a large batch of stock and freezing it in smaller portions. This allows you to thaw only the amount you need for a recipe, rather than defrosting the entire batch.
- For added flavour and depth, consider roasting your vegetable scraps or bones before simmering them to make stock. Roasting caramelises the sugars in the ingredients, resulting in a richer and more flavourful stock.
Creative Uses for Homemade Stock:
- Use homemade chicken or vegetable stock as a base for soups, stews, and chili for a flavourful and comforting meal.
- Add depth of flavour to risottos, pilafs, and grain dishes by substituting water with homemade stock during the cooking process.
- Make homemade sauces and gravies by reducing homemade stock with aromatics, herbs, and spices until thickened and flavourful.
- Use homemade stock to deglaze pans and add moisture to sautéed vegetables or meats for a delicious and nutritious meal.
- Incorporate homemade stock into braised dishes, such as pot roasts, braised chicken, or beef stew, for tender results.
Pre-Chopped Veggies: Streamline Your Cooking Process

Prepping vegetables in advance is a game-changing strategy for busy weeknights when time is of the essence. By taking a little extra time to wash, chop, and store your veggies ahead of time, you'll eliminate one of the most time-consuming steps in meal preparation and ensure that you always have fresh produce on hand to incorporate into your meals. Opt for sturdy vegetables like carrots, bell peppers, broccoli, cauliflower, and cucumbers, which can be washed, sliced, and stored in airtight containers in the refrigerator for up to a week. Use your pre-chopped veggies as building blocks for quick and easy stir-fries, salads, grain bowls, omelettes, and sheet pan dinners, adding colour, texture, and nutrients to every meal with minimal effort. With pre-chopped veggies at your fingertips, eating healthily has never been more convenient or delicious.
Storing Pre-Chopped Veggies:
- Pre-chopped veggies are a lifesaver when it comes to streamlining your cooking process and ensuring that you always have fresh produce on hand.
- To store pre-chopped veggies, start by washing and drying them thoroughly to remove any dirt or debris. Next, chop the veggies into uniform pieces of your desired size and place them in airtight containers or resealable bags. Store the containers in the refrigerator, where they will remain fresh and crisp for up to a week.
- For longer-term storage, consider blanching the pre-chopped veggies before freezing them in portion-sized bags or containers. This will help preserve their colour, flavour, and nutritional value for months to come.
Tips and Tricks for Freshness and Ease of Use:
- When prepping veggies in advance, be sure to choose varieties that are sturdy and have a relatively long shelf life. Examples include carrots, bell peppers, broccoli, cauliflower, cucumbers, and snap peas.
- To prevent moisture buildup and extend the shelf life of pre-chopped veggies, consider placing a clean paper towel or cloth in the container to absorb excess moisture. This will help prevent the veggies from becoming soggy or spoiling prematurely.
- Keep pre-chopped veggies visible and easily accessible in the refrigerator to encourage frequent use. Consider storing them in clear containers or glass jars on eye-level shelves for maximum convenience.
Creative Uses for Pre-Chopped Veggies:
Whip up a quick and nutritious stir-fry by sautéing pre-chopped veggies with protein-rich tofu, chicken, or shrimp and your favourite stir-fry sauce. Serve over cooked rice or noodles for a satisfying meal.
Create a vibrant and colourful salad by tossing pre-chopped veggies with mixed greens, protein-rich beans or grilled chicken, and a homemade vinaigrette. Top with nuts, seeds, or crumbled cheese for added flavour and texture.
Incorporate pre-chopped veggies into omelettes, frittatas, or quiches for a delicious and nutritious breakfast or brunch option. Simply sauté the veggies until tender and fold them into the egg mixture before cooking.
Make a hearty and comforting soup or stew by simmering pre-chopped veggies with broth, canned tomatoes, and your favourite herbs and spices. Enjoy as a standalone meal or serve with crusty bread for dipping.
Use pre-chopped veggies as a topping for homemade pizzas, flatbreads, or tacos for a fresh and flavourful twist on your favourite dishes.
With these three foods on hand, you'll be well-equipped to tackle meal prep like a pro and enjoy delicious homemade meals with ease and confidence. Let the power of homemade granola, flavourful stock, and pre-chopped veggies transform your kitchen into a culinary haven where wholesome and nourishing meals are always within reach. Happy cooking!
Need a little inspiration for how to use your prepped ingredients in a meal? Here's a recipe for a quick and easy soup that puts these ingredients to good use – the best part? It’ll set you back just 20 minutes.
Vegetable and Lentil Soup
Serves 4
Use your meal-prepped ingredients to whip up a healthy and hearty Vegetable and Lentil Soup on a busy Monday night. With homemade vegetable stock and pre-chopped veggies at the ready, this recipe comes together in no time, providing a nourishing and satisfying meal for you and your family. Simply sauté the aromatics, add the lentils and stock, then toss in your pre-chopped mixed vegetables for a colourful and nutrient-packed soup that's bursting with flavour. Enjoy a cosy and comforting dinner that's as convenient as it is delicious, all thanks to your thoughtful meal-prep efforts.

Ingredients:
- 1 tablespoon olive oil
- 1 onion, diced
- 2 carrots, diced
- 2 celery stalks, diced
- 2 cloves garlic, minced
- 1 teaspoon dried thyme
- 1 teaspoon dried oregano
- 2 cans lentils, drained and rinsed
- 6 cups homemade vegetable stock or store-bought low-sodium vegetable broth
- 2 cups pre-chopped mixed vegetables (such as bell peppers, broccoli, cauliflower, and zucchini)
- Salt and pepper, to taste
- Fresh parsley, chopped (for garnish, optional)
Instructions:
- Heat the olive oil in a large pot or Dutch oven over medium heat. Add the diced onion, carrots, and celery, and sauté until softened, about 5 minutes.
- Add the minced garlic, dried thyme, and dried oregano to the pot, and cook for an additional 1-2 minutes until fragrant.
- Stir in the drained and rinsed canned lentils, followed by the homemade vegetable stock. Bring the soup to a boil, then reduce the heat to low and let it simmer, partially covered, for about 10-15 minutes to allow the flavours to meld.
- Add the pre-chopped mixed vegetables to the pot, and continue to simmer for another 5-7 minutes, or until the vegetables are tender but still slightly crisp.
- Season the soup with salt and pepper to taste, adjusting the seasoning as needed.
- Serve the Quick Vegetable and Lentil Soup hot, garnished with fresh chopped parsley if desired.
Need a little help getting your health back on track? We’ve put in the hard yards so you can enjoy the benefits of an extensive, wholistic program that covers everything from learning how to manage nutrition and mental health to social situations. When you join us for the 8-Week Program you’ll have exclusive access to expert guidance, nutritional planning and support every step of the way. Take a peek at what’s on offer:
- 8 weeks of meal plans and shopping lists.
- A range of exclusive recipes, including sugar-free desserts, snacks and all the old favourites.
- Community forums to share and discuss your experience.
- Expert support to guide you through each week – from world-renowned chef Sarah Glover to yoga teachers, nutritionists and naturopaths.

Don’t wait, JOIN NOW!